Description of Basic Features
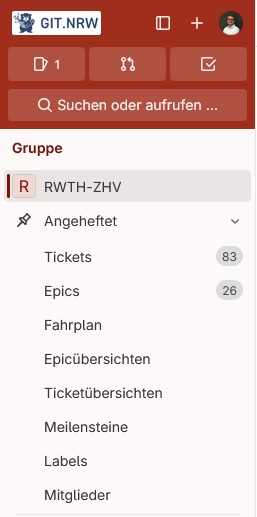
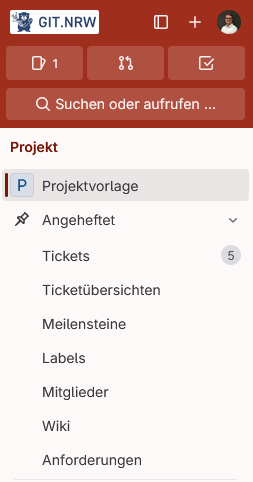
It is recommended to pin important project management functions in the left sidebar. These functions are displayed individually, depending on the active level — either group (left image) or project (right image). Therefore, it is useful to pin functions such as Issues, Issue Boards, Milestones, Labels, Members, and optionally Wiki at the project level, and Epics, Epic Boards, and Roadmap at the group level. This is done by activating the pin icon at the right edge of the function with your mouse pointer. Under the main menu item “Manage”, you will find Labels and Members. The other functions are located under the “Plan” section.
| Sidebar at Group Level | Sidebar at Project Level |
|---|---|
|
|
Note: Functions can be configured individually at both the group and project level. For example, Issue Boards or Labels may differ at each level. Moreover, all issues from sub-projects are displayed in the parent group. Your sidebar is set platform-wide, meaning pinned functions are also pinned in other projects or groups. All other functions can still be found under the Planning item.
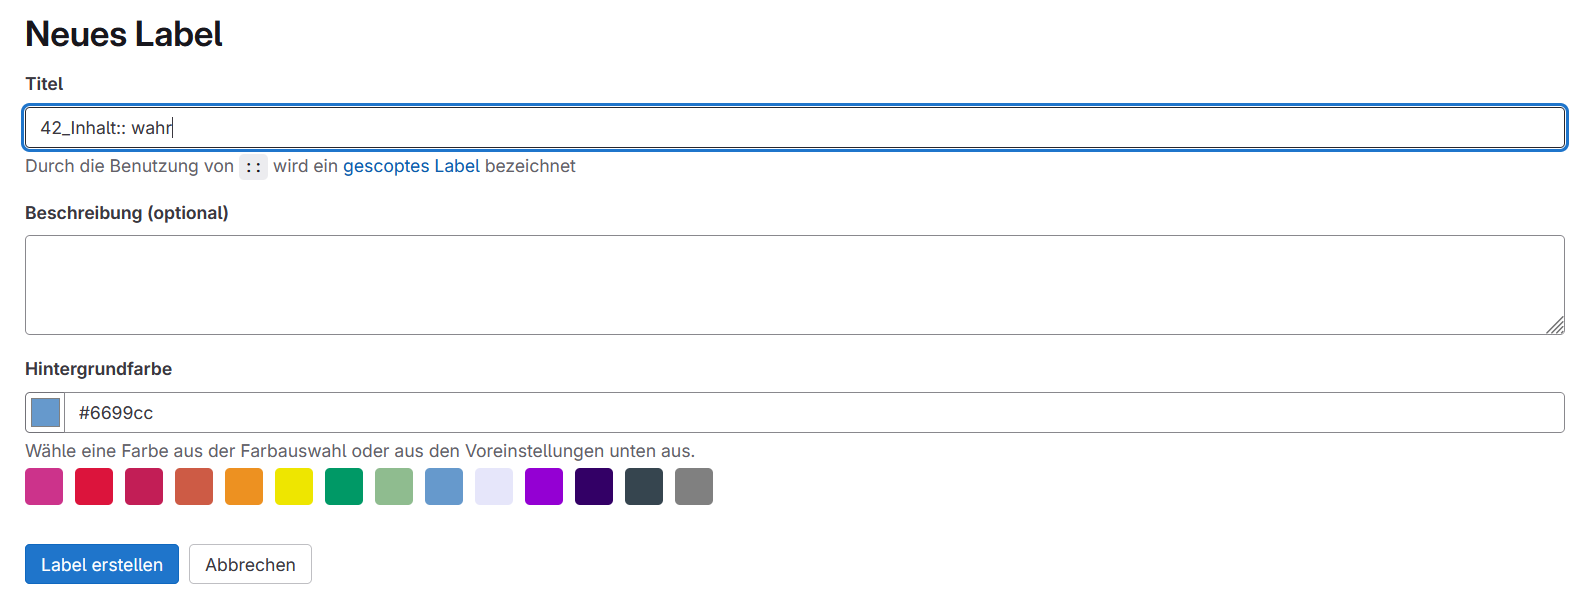
Under the Labels menu item, a pre-configured list of labels is available using the project template. These can be used to tag tasks (issues or epics) and can be easily adapted to your own preferences. The labels 1_Prio, 2_Status, 4_Concept, and 5_Workflow are so-called “scoped labels”. Each task or epic can be labeled with only one label per type. This type of label can be activated using two colons (e.g., 1_Prio:: high) and is visually marked by a white right side, as shown in the image.

| Label | Description |
|---|---|
| 1_Prio:: urgent | Tasks that must be prioritized above all others |
| 1_Prio:: high | Tasks with strict deadlines that must be met |
| 1_Prio:: medium | Tasks with no or only soft deadlines, but essential for project progress |
| 1_Prio:: low | Tasks without deadlines and not essential for project progress |
| 2_Status:: open | Tasks that have not yet started |
| 2_Status:: in progress | Tasks currently being worked on |
| 2_Status:: paused | Tasks that are paused or postponed |
| 2_Status:: in testing | Tasks currently in a testing phase |
| 2_Status:: discarded | Tasks that are not completed and will not be worked on |
| 2_Status:: completed | Tasks that have been completed |
| 3_Type: Standard Task | A standard task that may include a few subtasks and can be assigned to a main task |
| 3_Type: Subtask | A subtask assigned to a main task or a standard task |
| 3_Type: Idea Collection | Not a task, but a collection of ideas, thoughts, and suggestions |
| 4_Concept:: released | Concept issues that are approved for implementation (configuration) |
| 4_Concept:: coordination | Concept issues currently being coordinated with involved individuals or bodies |
| 4_Concept:: draft | Concept issues in the drafting/concept phase |
| 5_Workflow:: Position A | Workflow labels can be used to represent work processes, for example, tasks handled by multiple people or across different subject areas. The label should be adjusted accordingly. |
| 5_Workflow:: Position B | Workflow labels can be used to represent work processes, for example, tasks handled by multiple people or across different subject areas. The label should be adjusted accordingly. |
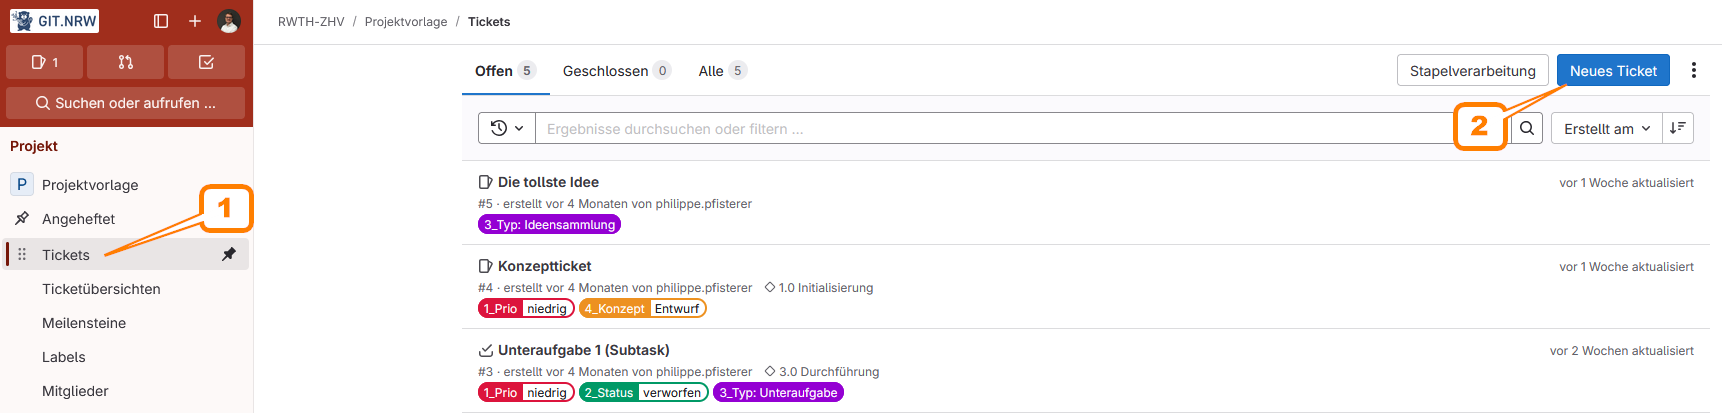
Under the "(1) Issues" menu item, a new task can be created using the "(2) New Issue" button. A task is a specific project activity for which one person is responsible, and one or more people can work on it.
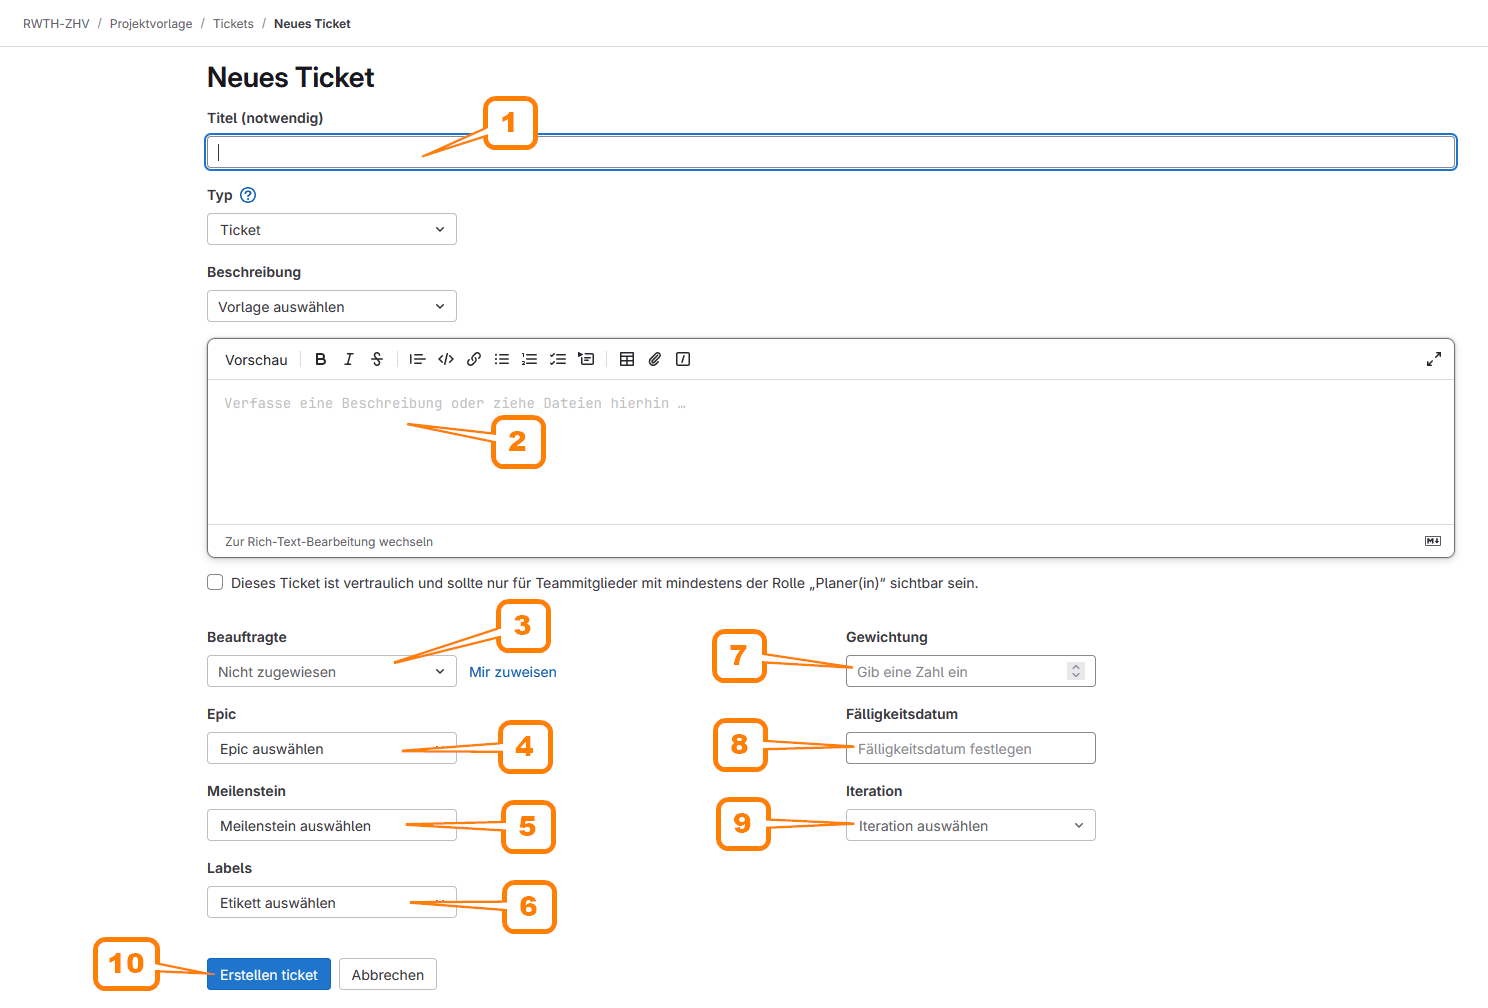
Each issue has several properties that can be individually set. These include:
- Title (required) for the task
- Write a description for the task
- Select an assigned person
- Choose a parent epic
- Add a milestone
- Add necessary labels
- Add a weighting
- Set a due date
- Set an iteration
- Create the issue
Only the "(1) Title" is a required field, although it can be edited afterward. All other fields are optional and can be adjusted later as well.
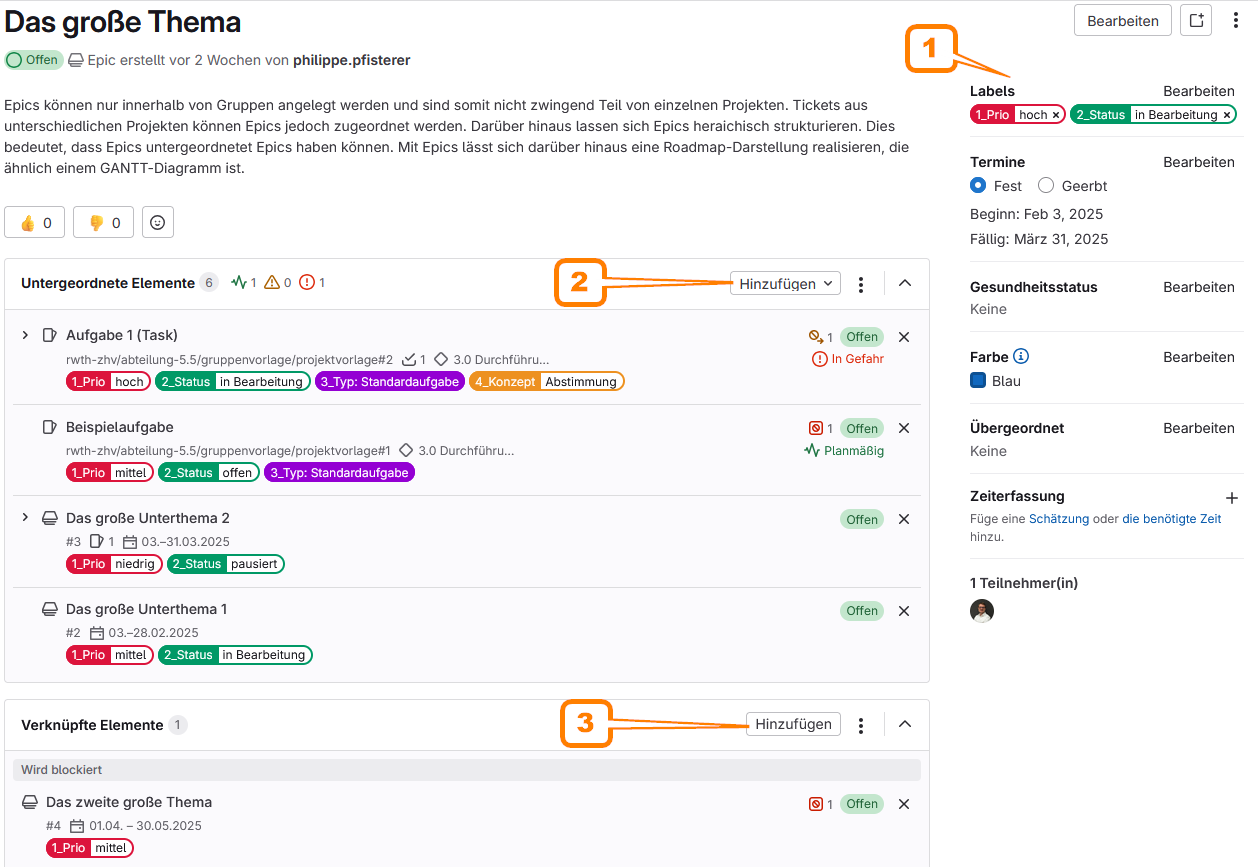
Issues can be linked to other issues if they are thematically dependent. The following dependencies can be set: “relates to”, “blocks”, and “is blocked by” (see "(1)Linked Elements").
Each issue can be edited, commented on, and fine-tuned. In the "(2) right column", you can assign assignee(s), labels, milestones, iteration, weighting, due date, and optionally a time tracking with planned and actual time. Additionally, "(3) sub-elements" in the form of subtasks (subtasks) can be created within the issue. It is recommended to label these with “Type: Subtask”.
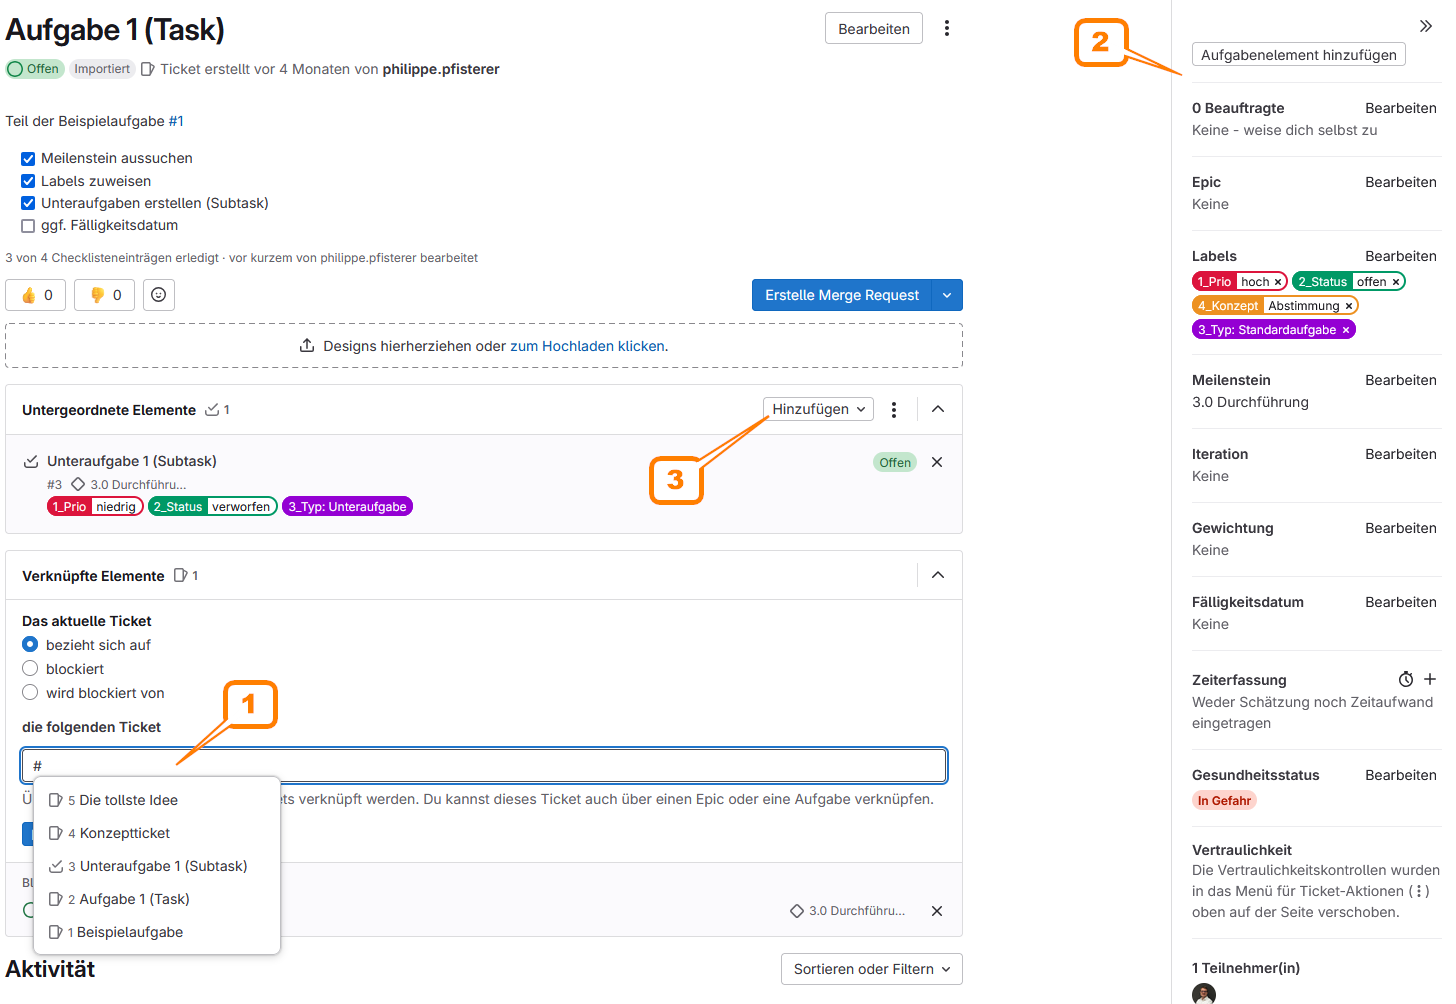
Subtasks can be configured in the same way as regular issues. However, no further sub-elements can be created.
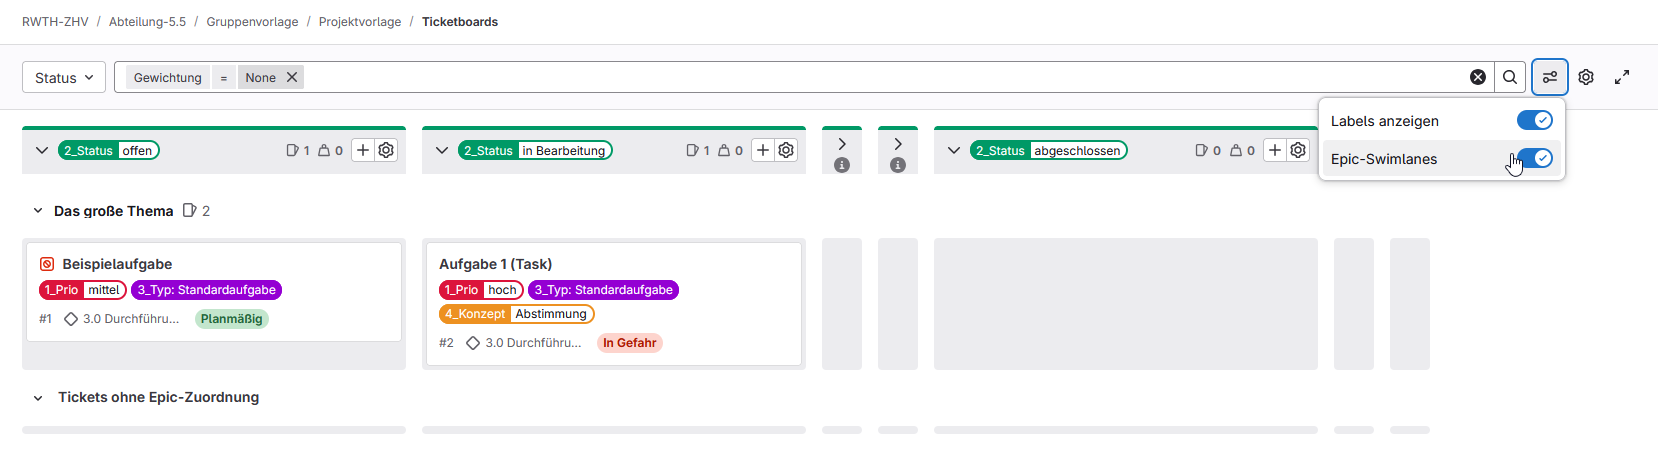
Issue Boards can be created in the Issue Views section, which function similarly to a Kanban board. Lists can be created based on labels, assignees, milestones, or iterations. Six pre-configured boards are already available and can be easily adjusted, changed, extended, or deleted.
- Task Types: Sorted by standard task, subtask, or idea collection
- Task Assignment: Tasks can be assigned to individuals
- Concept Phases: Board for the scoped labels “4_Concept”
- Priorities: Board for the scoped labels “1_Prio”
- Status: Board for the scoped labels “2_Status”
- Workflow: Board for the scoped labels “5_Workflow”
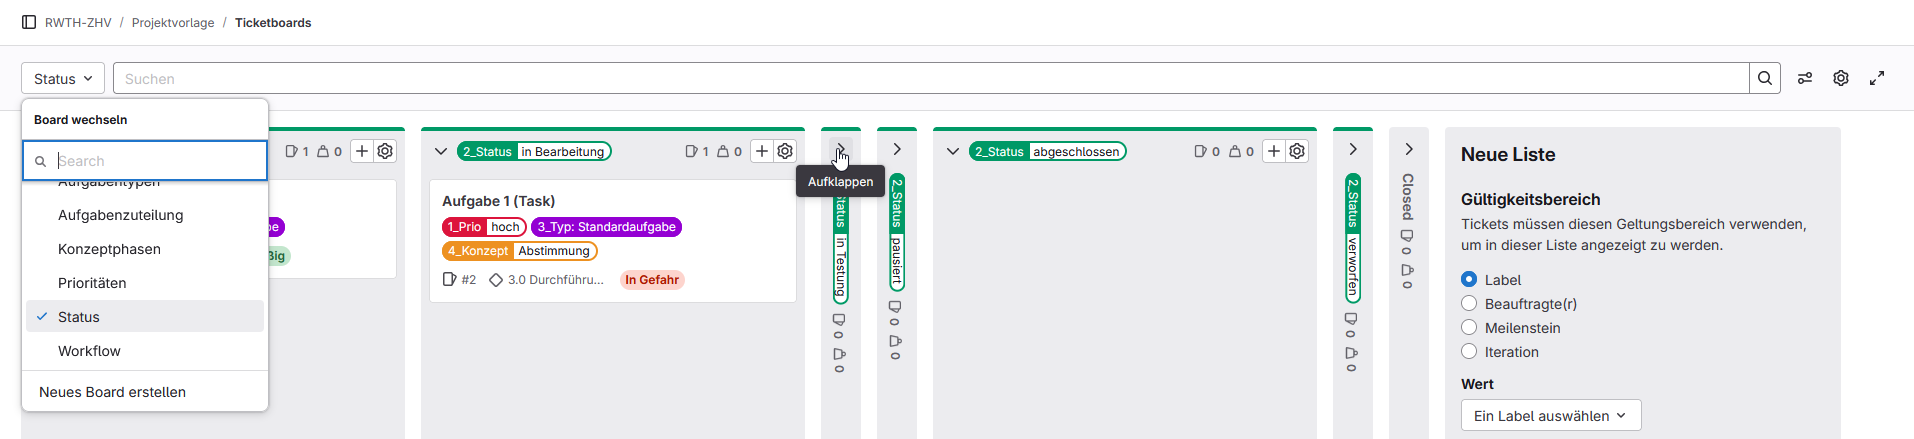
Notes:
- Issues can be created directly on a board using the "+" button, which automatically assigns the appropriate label.
- Issues can be moved from one list to another using drag-and-drop.
- In the top-right header, epic swimlanes can be activated. This allows issues to be displayed not only by label, but also in rows corresponding to their associated epics.
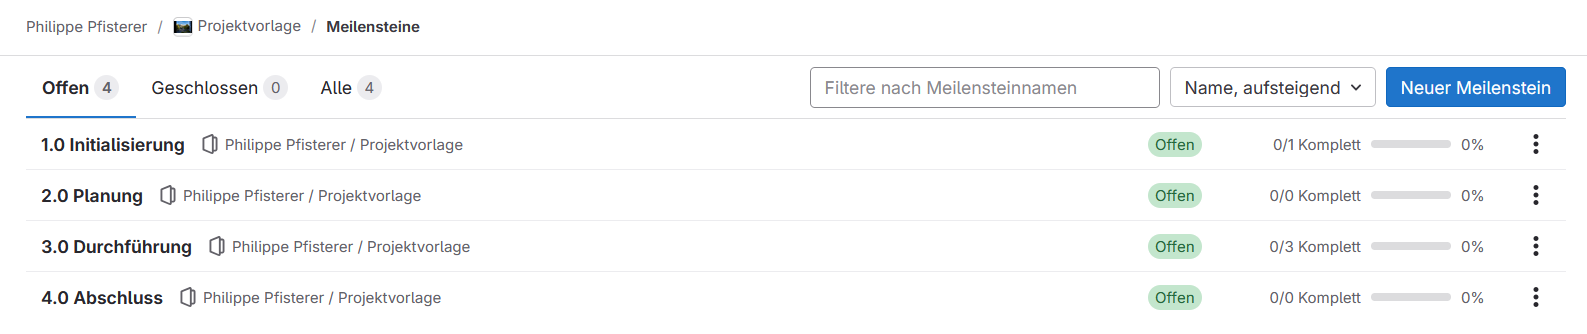
Milestones contain a list of predefined milestones aligned with a classic 4-phase model. These can, of course, be adjusted, modified, or extended. At the group level, all milestones from sub-projects are displayed. Milestones include a “title,” “start date,” “due date,” and a “description.”
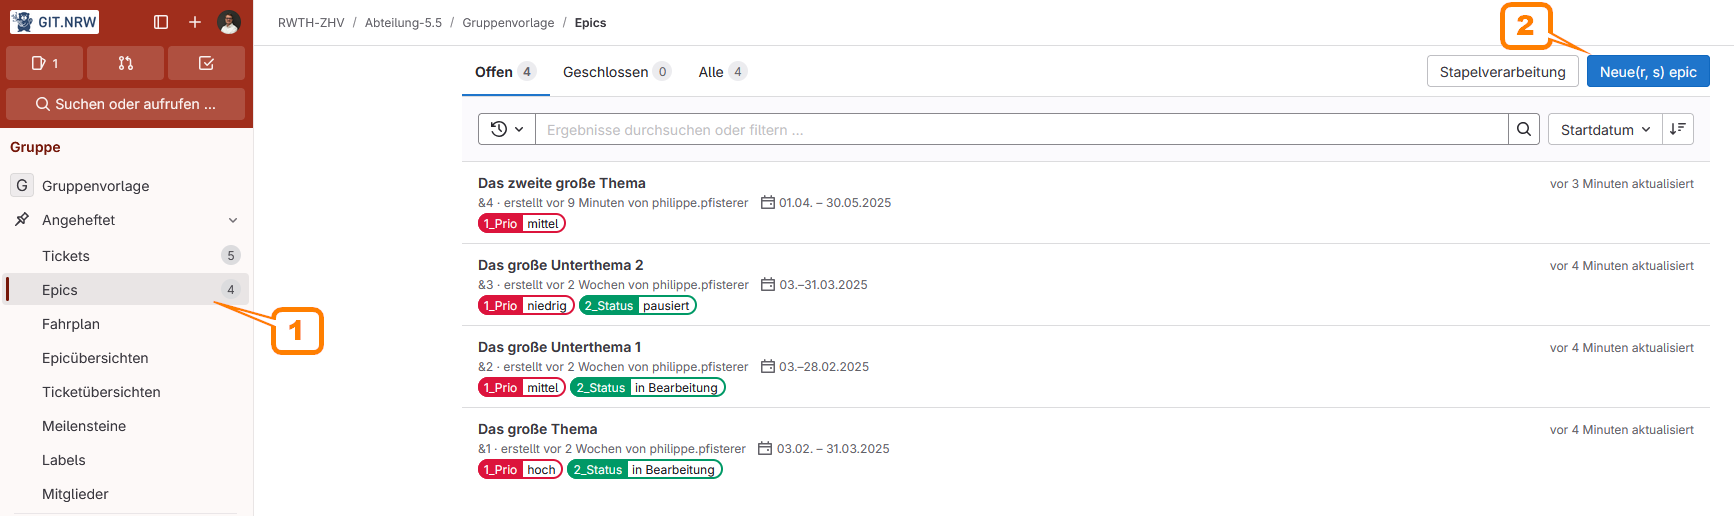
At the group level, main topics can be created in the form of (1) epics. To do so, click on "(2) New Epic" under the “Epics” menu item.
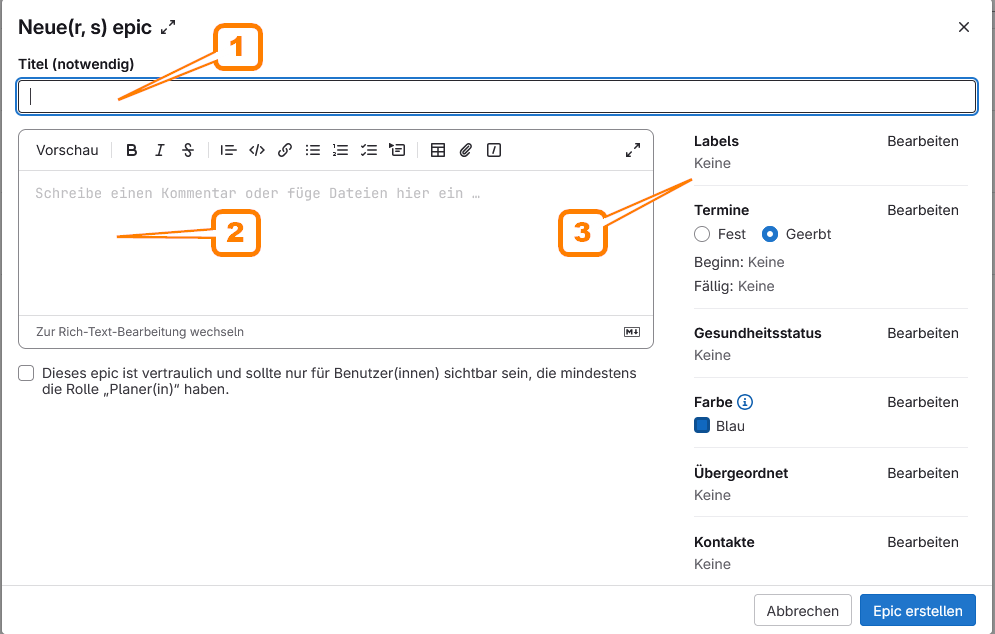
An epic includes settings similar to an issue, although there is no assigned person, as task management should occur via projects and their issues.
- Title (required) for the epic
- Write a description
- Additional settings such as assigning labels or setting a timeframe are possible
A created epic can be further configured:
- In the right column, additional settings such as assigning labels or setting a timeframe are possible
- Sub-elements in the form of new or existing epics and issues from projects can be added
- Under Linked Elements, epics can be connected to each other
Similar to issue views, there are also Epic Views at the group level. However, sorting is only possible by labels.

Clicking on "(1) Roadmap" in the sidebar displays the roadmap. Under "(2) Settings," the display can be adjusted.

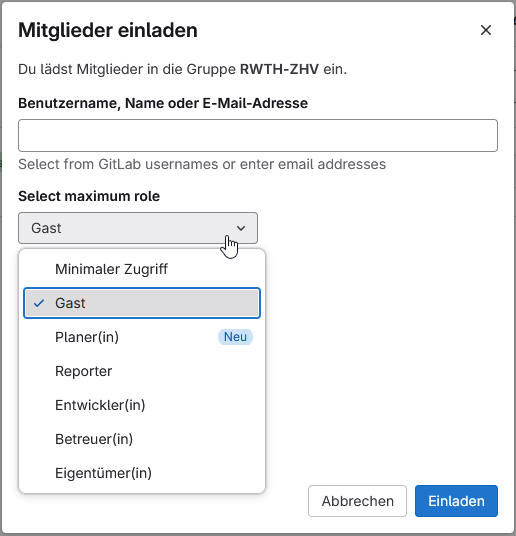
Under "(1) Members," additional people can be assigned to a group or project. Invitations are sent using the "(2) Invite Members" button. The invited person needs a git.nrw account. The account is created during the first login via the university’s SSO. For external persons, a git.nrw guest account must be created.
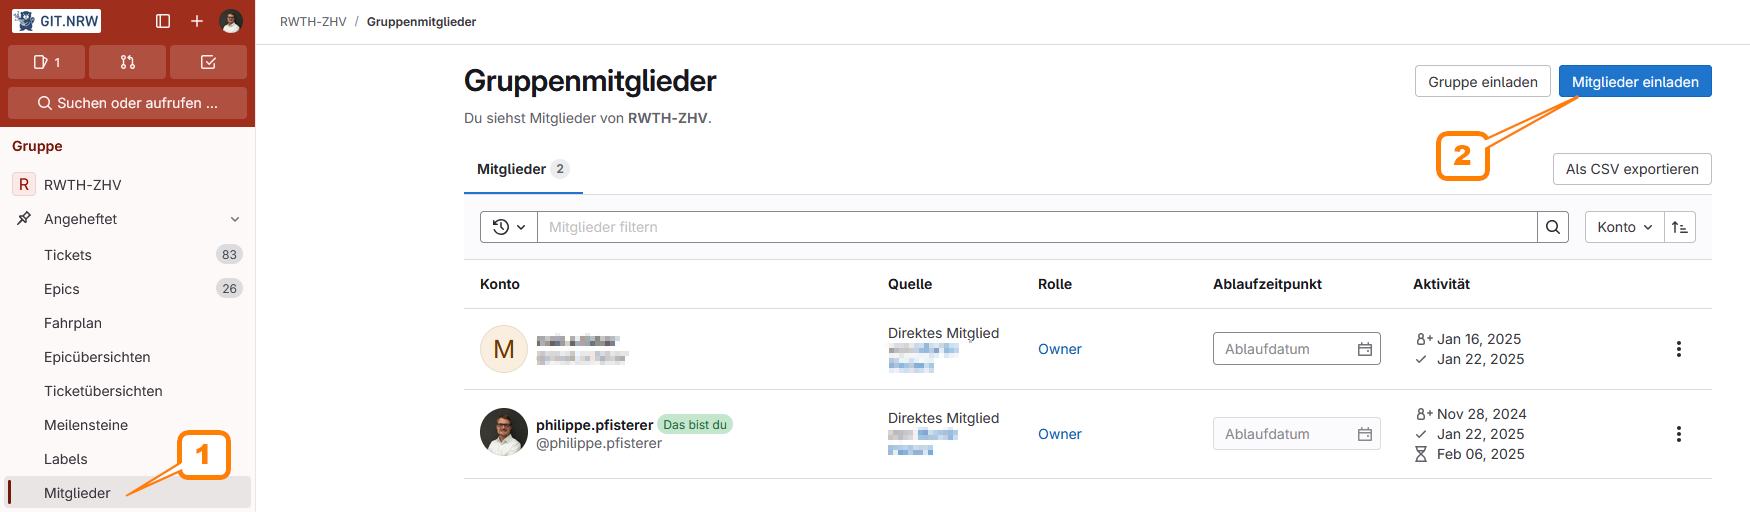
Members must be assigned a role that defines their permissions. The appropriate roles must be decided individually for each project. The highest permission levels are “Owner” and “Maintainer”. These roles are typically assigned to the person or team responsible for managing and maintaining the group or creating the project. For regular participants, the role “Planner” is recommended. A summary of the permissions is shown in the table below. A more detailed description is available in the GitLab documentation: Role Permissions .